Setup a Udp Controller With Easy Esp Controller Publish Subsicribe
Contents
- i Up-to-date documentation
- 2 ESP Like shooting fish in a barrel web interface
- ii.one Main folio
- 2.2 Config page
- 2.3 Controllers page (version 2.0+)
- 2.4 Hardware page
- two.5 Rules page
- 2.6 Notifications page (version ii.0+)
- 2.7 Devices page
- two.7.1 Why only 12 tasks?
- ii.7.two Device plugins (official used in primary)
- two.viii Tools page
- 2.viii.1 Tools Log folio
- two.eight.1.1 Log entries
- 2.8.ii Tools Advanced page
- 2.8.3 Tools Wifi scan
- 2.viii.4 Tools I2C scan
- 2.8.5 Tools Settings up/download
- ii.eight.6 Tools Firmware update using OTA
- 2.8.7 Tools File List (version 2.0+)
- 2.8.8 Tools SD CARD File Listing (version ii.0+)
- two.8.9 Tools Pin Land Buffer (version 2.0+)
- 2.8.10 Tools Arrangement Info (version ii.0+)
- 2.viii.1 Tools Log folio
- 2.ix JSON page (hidden prior to version ii.0+)
- 2.10 Setup page (version ii.0+)
- three Customization
- 4 Fill-in and restore
- 4.1 The one place, get them all - manner
- 4.2 The official settings backup way
- four.iii The hardcode way
- 4.4 Reset the unit
Up-to-date documentation
Warning This documentation is outdated, please refer to ReadTheDocs
ESP Easy web interface
The ESP Piece of cake has a convenient web interface for all configuration settings. They are locally stored in flash retentiveness and retained on power-off.
Do Not expose the ESP Easy web interface straight to the cyberspace, e'er make certain that the web interface is only reachable from "trusted/local" networks!
We volition explain all configuration pages and settings:
Chief page
URL:<espeasyip>
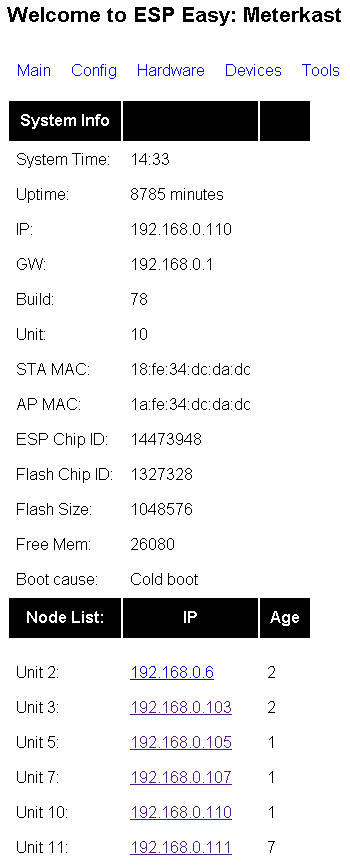
This is an advisory page that provides some technical and operational parameters. The lesser one-half shows a node list of all known ESP units that are running in your network (this is optional and needs to be configured in tools/advanced)
The list only shows live systems. Age is number of days it has been connected.
Free Mem is bachelor retentiveness, this should exist above 20 000 (byte) for the ESP to feel happy.
Config page
URL:<espeasyip>/config
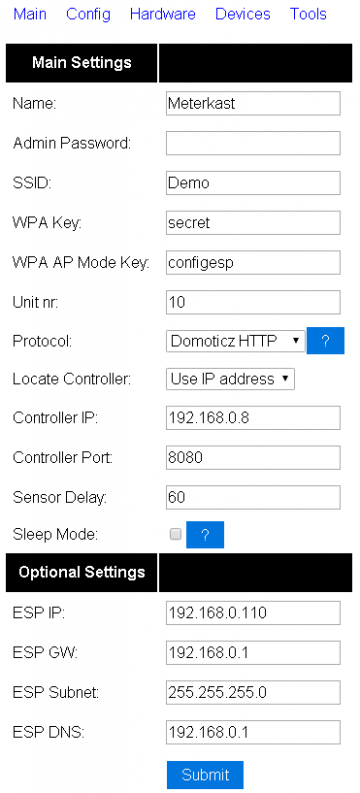
Main settings can be constitute under "Config" page.
Name Can be set to an easy to remember proper noun for this system. Tin also exist used in MQTT communication templates.
Admin Password Tin can be set if you want to protect your system config with a password. Default is zip (none).
SSID Wifi network SSID
WPA Key The key used on your Wifi Access Point
WPA AP Mode Key The primal that ESP Easy will use if it starts as a Wifi Access Betoken to set the starting time time configuration. Default is "configesp".
Unit nr Each ESP Easy unit needs a unique number in the range 1-31. Merely relevant for UDP unicast bulletin 'sweeps' and the nodelist.
Protocol Select the protocol for your Home Automation controller or webservice like ThingSpeak.
Locate Controller Y'all tin can set up the controller based on information technology'south DNS hostname or it's IP address.
Controller IP/Hostname Fix IP or hostname for the controller
Controller Port Set the TCP port used on your controller or webservice.
Sensor Delay Set the filibuster betwixt sensor reporting in seconds.
Sleep Mode Tick this field to use the ESP in deepsleep manner for low ability functioning. Read more than: SleepMode
Optional
ESP IP You can set a static IP for this ESP unit of measurement. Set to 0.0.0.0 to employ DHCP
ESP GW If using a static IP, enter the gateway (not needed if no connection to internet is needed!)
ESP Subnet Enter the local used subnet, usually 255.255.255.0
ESP DNS Enter you local DNS server IP address. Usually the IP of your local internet router.
Extra data
The AP name will exist constructed of Name and Unit nr and default would this be "ESP_Easy_0". In other give-and-take <proper noun>_<unit number>.
Controllers page (version ii.0+)
URL:<espeasyip>/controllers
It is possible to have multiple controllers/brokers activated.
Settings page (below), as of current status the OpenHAB MQTT is the nigh generic 1. But remember to remove the / in the beginning of the subscribe and publish topic string.
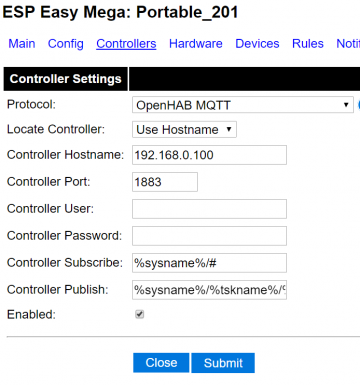
Default settings: Controller Subscribe: %sysname%/#
Controller Publish: %sysname%/%tskname%/%valname%
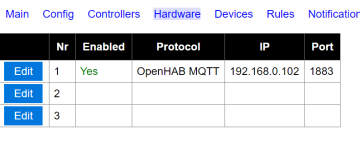
Hardware page
URL:<espeasyip>/hardware
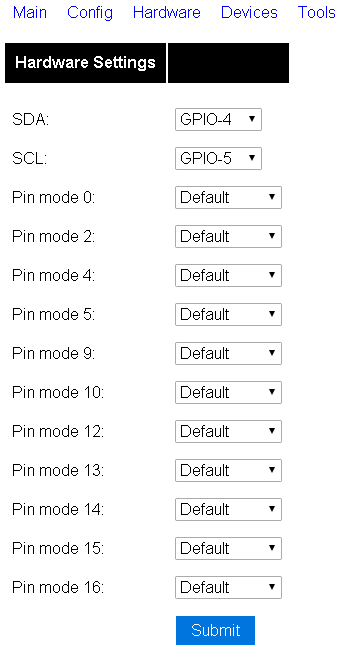
Condition LED (version ii.0 merely) Select the data pin used for a depression active LED to show the status of the firmware. Utilize D4 (GPIO2) for the on-board blue LED.

SDA Select the data pin used for I2C communications.
SCL Select the clock pin used for I2C communications.
Pivot mode x Select an optional kicking state for this pin, either output low or loftier (but please understand that issues might occur with these settings every bit they former clash with internal need for low or loftier settings. For instance GPIO 9 has been reported non to obey these settings on some boards). Run into Configuration for more information regarding the GPIOs!
I2C is a well known standard to permit multiple devices communicate over just 2 wires (and ground). We employ it to connect sensors to ESP Piece of cake. You tin can connect multiple sensors to the aforementioned two wires. Don't forget to use pull-up resistors on both SDA and SCL, unless one of your sensors already has them mounted on board.
Rules page
URL:<espeasyip>/rules

Here'southward where the rules goes. More on how to use rules is found here.
Notifications page (version 2.0+)
URL:<espeasyip>/notifications

It is possible to have the ESP unit send emails or giving you notifications using a buzzer.
Devices page
URL:<espeasyip>/devices
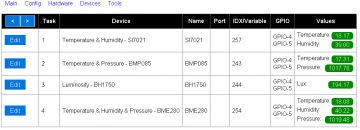
This is a list of tasks that the ESP Easy will perform. A sensor needs to be defined here to go the values transport to your controller.
Later selecting a new device, press the ? push button to get specific help on this device!
Almost common mistake if your values remain 0: The ESP Easy mainly targets Domoticz and the internal framework is entirely build upon the IDX field. This needs to match Domoticz. If you run a different protocol, it tin can be any value but must exist not-zip. Just cull 'i' in those cases... (IDX is non generally need in version ii.0+)
Why just 12 tasks?
A common question is why the maximum tasks/devices are prepare to 12. This has to do with the architecture of the firmware. The firmware config file is a stock-still size (every bit is occupied) and this means that the firmware need to know which bits that are used for what purpose. 12 is therefor a chosen number of max tasks/devices, not to many and not to few. If you were to extend this number you might happen to write over bits that are used elsewhere. It is possible to compile your own version of ESP Easy with more 12 tasks just beware of this fact. More devices might corrupt your system.
Device plugins (official used in main)
Here you find a list of all the available plugins that are in the official release of ESP Easy.
Tools page
URL:<espeasyip>/tools

Some maintenance tools. You can send commands using the input box. See more on commands here.
Tools Log page
URL:<espeasyip>/log
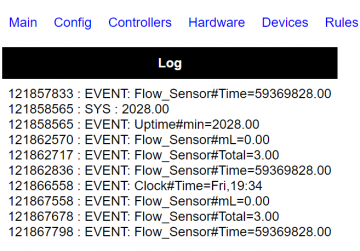
This page can be used for debugging bug. The debug level is set to '2' by default and will testify sensor readings. Debugging levels tin be inverse under Tools/Advanced.
If your system runs fine, yous tin set the level to '0' to turn of logging. This will salvage valuable RAM!
Log entries
Here you'll discover links to sub pages where you'll be able to find explanation on log entries:
Wifi data
Tools Advanced page
URL:<espeasyip>/advanced
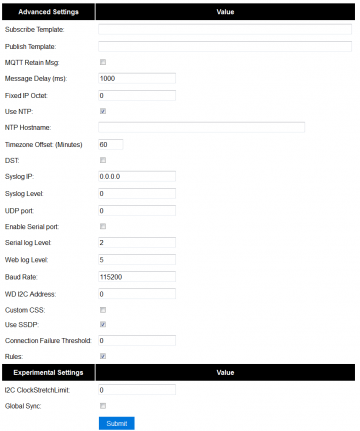
Subscribe Template Used for MQTT subscription. Selecting a MQTT protocol will automatically fill this field
Publish Template Used for MQTT publishing. Selecting a MQTT protocol volition automatically fill this field Information technology is also used for the Generic HTTP protocol. Create your custom template here.
MQTT Retain Msg Volition send the MQTT bulletin with a retain flag. This makes the broker holding the concluding received message in memory. Practiced for monitoring the broker using a MQTT scanner etc.
Bulletin Interval To forestall overloading your controller or webservice, a delay between reports tin can be set. Defaults to 1000 milliseconds. In general the default is great but with certain setups you may want to lower this to make repeated button presses etc. more responsive, recommended minimum is 100 milliseconds. For ThingSpeak, you demand to gear up this to 15000! to accept multiple sensor readings working
Fixed IP Octet Special network config where the ESP starts with DHCP to get the basic network config and so sets the last octet to a fixed IP.
Employ NTP To enable internal software clock, synchronized using internet fourth dimension.
NTP Hostname Can exist left empty as information technology defaults to pool.ntp.org. Tin be changed here if needed.
Timezone Offset Offset in minutes to GMT. In the Netherlands this should be '60'
DST Daylight Saving Time. Must be set manually when DST is active to accommodate the fourth dimension.
Syslog IP Enter your syslog server IP if yous have ane running and want to debug something. For Windows users in that location'due south a portable sys log server called tftpd (64bit/32bit) which we recommend. Just download the portable application and unzip it somewhere on your Windows machine. In ESP Easy you enter the IP of your machine where you run the syslog server. Change syslog level to 4 and then you just go to the correct tab in tftpd (Syslog server) and look for incoming letters. Recall to remove the settings (IP="bare" and loglevel=0) once you're washed.
Screenshot for reference: ![]()
Syslog level Level of log messaging to the syslog server. Can be set up between 0 - 4 (0=no logging, 1=error, two=error+info, 3=fault+info+debug, 4=error+info+more than debug)
UDP port This is used for communication between ESP unit'southward. 65500 is just a sample. Apply a number that does not conflict with other systems on your network every bit the ESP uses broadcast messages. If you have a syslog server running, practise non enter 514 hither!. This fields needs to exist non-zero to have the node list running.
Enable Serial Port Enable/disable the serial port.
Serial log level Level of log messaging to the serial port. Can be set between 0 - 4 (0=no logging, 1=error, 2=error+info, 3=error+info+debug, iv=error+info+more debug)
Weblog level Level of log messaging to the web gui. Tin be set between 0 - four (0=no logging, 1=error, ii=error+info, 3=mistake+info+debug, 4=fault+info+more debug)
Baud Rate Serial port baud charge per unit
WD I2C Address I2C accost to send watchdog messages to. Experimental feature to feed a ATTiny based external watchdog.
Custom CSS Tick this box to employ a custom CSS (style canvas). You must start upload a "esp.css" file one to use this. The CSS filesize tin can non exceed 4 kbyte!.
Apply SSDP SSDP is a network protocol based on the Internet Protocol Suite for ad and discovery of network services and presence information. This option toggles this service.
Rules Tick this checkbox to enable the Rules section for scripting the device. Else the rules aren't visible and editable and won't be candy at all.
I2C ClockStrechLimit
Global Sync
Tools Wifi browse
URL:<espeasyip>/wifiscanner
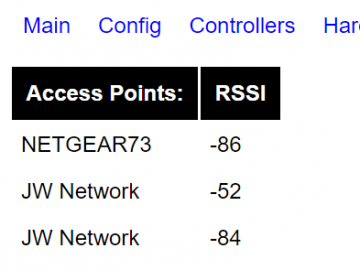
Here'due south a list of all accessible wifi networks and their signal force.
Tools I2C scan
URL:<espeasyip>/i2cscanner
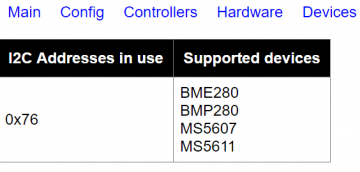
If one or more than I2C devices are connected to the ESP Piece of cake, you tin can use this scan characteristic to verify if devices can exist located using their I2C address. If no device is shown, you probable made a mistake on wiring or the I2C configuration in the Hardware page.
If the I2C scanner lists an accost, it volition also listing some well known devices that are stock-still or typically found on that address. Information technology does Not mean that the detected device is verified to piece of work in whatsoever style. I2C devices use a seven flake address and the ESP will just scan all 127 possible addresses. If a device listens to some accost it will admit this to the ESP. It does non written report the type of device so the ESP can only tell that something is listening!
Tools Settings upwards/download
URL:<espeasyip>/upload (for uploading settings)
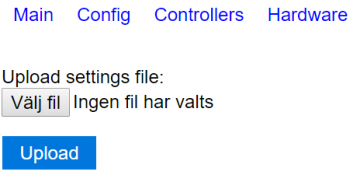
URL:<espeasyip>/download (for downloading settings, not a webpage merely a direct download)
The ESP Piece of cake settings can be saved to your computer so you can restore them if they are lost or you just want to restore them later on some experimenting. You can also upload a custom style sheet.
The system recognizes only two filenames:
config.dat
This file contains the ESP main configuration settings, except security information. The filesize should be 32k. You tin can substitution this file with other people if you like, because WPA keys and config countersign are not stored into this file.
Security data cannot be saved or restored from file!
esp.css (Custom Style Sheet, max 4 kb !)
If you want to customize the web gui you can upload (a modest) css file. Remember that the webgui is only there for configuration so customization is limited. You may use the following stylesheet equally an working example or template for further customization. And don't forget to activate the uploaded stylesheet in the TOOLS>Avant-garde section by enabling the "Custom CSS" option. Read more almost customization in the ESP web interface customization portal.
Tools Firmware update using OTA
URL:<espeasyip>/update
![]()
Once your first ESP Piece of cake firmware is loaded using the serial interface, subsequent updates tin be loaded using the Wifi connectedness (if your unit has 1MB flash or more!). More details on OTA firmware update: EasyOTA
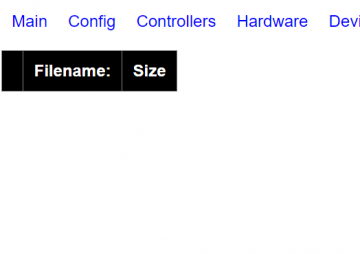
Tools File Listing (version two.0+)
URL:<espeasyip>/filelist
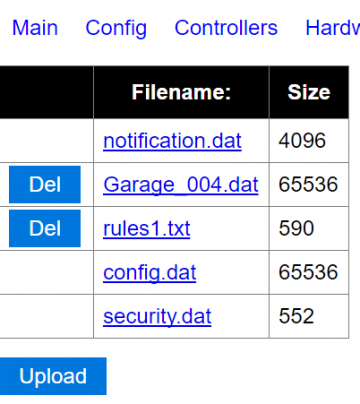
Access to the ESP'southward files. Possible to download for backup, or upload your ain files.
Tools SD CARD File List (version 2.0+)
URL:<espeasyip>/SDfilelist
Access to the ESP's files stored on the SD carte du jour (if any SD bill of fare). Possible to download for backup, or upload your own files.
Tools Pin State Buffer (version ii.0+)
URL:<espeasyip>/pinstates
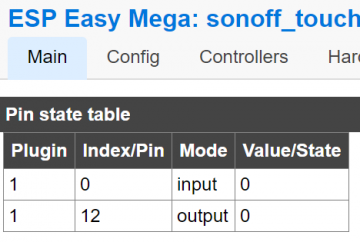
Here you lot can see what plugins are using what pins. Experimental as of now.
Plugin: is the plugin number that is using the GPIO. You detect the respective plugin in this list.
Index/Pin: is the GPIO number.
Mode: is the type of signal (input/output).
Value/State: is the current land of the GPIO.
Tools System Info (version 2.0+)
URL:<espeasyip>/sysinfo
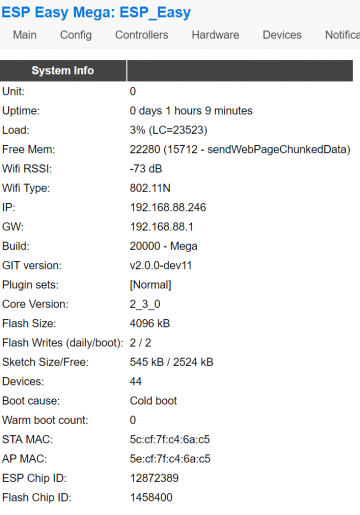
This page is a summarize of information regarding the arrangement (firmware version, size, plugins etc. etc.)
Load: this is the current load of the unit. LC is the loop count, how many times the loop() function has been run.
Free Mem: this is the gratuitous memory count, anything in a higher place 20 000 is good (20kb).
URL:<espeasyip>/json
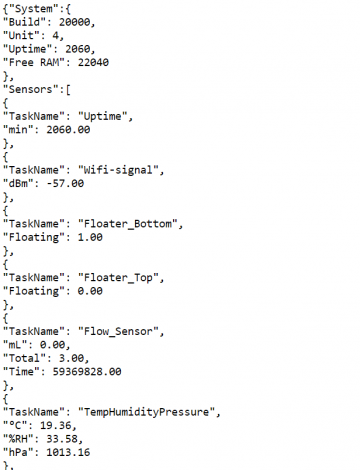
If you want to get the ESP units variables in a JSON bundle this is where y'all want to get.
To only go a specific chore'southward values you may employ this URL:
<espeasyip>/json?tasknr=<tasknumber>
where the task number is found on the device page.
If yous merely want the sensor values (no system information) you may use this URL:
<espeasyip>/json?view=sensorupdate
You can as well combine these two switches like this:
<espeasyip>/json?tasknr=<tasknumber>&view=sensorupdate
Setup page (version two.0+)
URL:<espeasyip>/setup
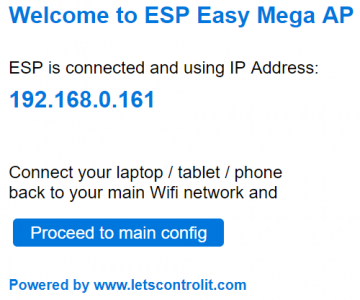
This page is presented later on the ESP Easy unit of measurement has connected to the WiFi. If yous have continued to the WiFi using serial commmands you will be presented with this page upon connection. If you lot continue to the primary config page (will direct you to <espeasyip>/config) the setup folio will not be opened the next time you lot connect to the unit's IP.
Customization
You tin can customize the expect and feel using your own template css file. More on that is institute in the specific ESP web interface customization page.
Backup and restore
To brand backups of your settings, rules and maybe custom css you lot may use one or more than of the post-obit procedures:
The one place, get them all - way
BACKUP
Using the "File list" folio y'all can click on the files that you want to backup.
config.dat the main settings file
security.dat the wifi settings and passwords
rules1.txt the first folio rules (does non exist if no rules is put into this page)
rules2.txt the second page rules (does not be if no rules is put into this page)
rules3.txt the third folio rules (does non exist if no rules is put into this page)
rules4.txt the fourth page rules (does not exist if no rules is put into this folio)
esp.css the customization file for the web interface (does not exist if no customization is done)
RESTORE
Yous can upload the files using the same procedure through the upload button found in the "File list" page. Make sure that the config file is renamed to config.dat if y'all accept downloaded it through the "The official settings fill-in fashion" procedure.
For more detailed information on how the settings are stored, see Settings storage layout
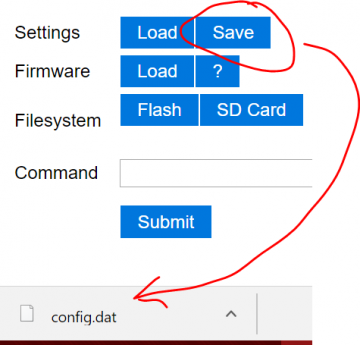
The official settings backup style
BACKUP
Using the "Settings Relieve" button volition download the config.dat file and rename information technology according to this nomenclature:
<espname>_<twelvemonth>-<month>-<twenty-four hours>.dat
case: Kitchen_2017-01-22.dat or ESPunit001_2018-12-24.dat
Rules are not possible to backup (or restore) this way.
RESTORE
You need to rename the dat file to config.dat and and so upload information technology using the "Settings Load" push button.
The hardcode way
BACKUP
If you know the IP accost yous can backup your settings, rules and customizations like this:
<espeasyip>/config.dat
<espeasyip>/security.dat
<espeasyip>/rules1.txt (will non piece of work if no rules exists)
<espeasyip>/rules2.txt (will not work if no rules exists)
<espeasyip>/rules3.txt (will not piece of work if no rules exists)
<espeasyip>/rules4.txt (will not work if no rules exists)
<espeasyip>/esp.css (will not piece of work if no customization exists)
RESTORE
Non possible using this process.
Reset the unit of measurement
The config file will not exist over written if you re-flash your device. If you want a clean unit yous need to use the "reset" command. Tin be done on the tools page (just type the command and hit submit).
If yous don't have the possibility to practice it from inside the web interface yous can connect RX and TX together. This will trigger a reset upon reboot.
Source: https://www.letscontrolit.com/wiki/index.php/ESP_Easy_web_interface
0 Response to "Setup a Udp Controller With Easy Esp Controller Publish Subsicribe"
Post a Comment